Case study
“pick up sticks” fibrous plaster ceiling for a Penthouse apartment in Mayfair

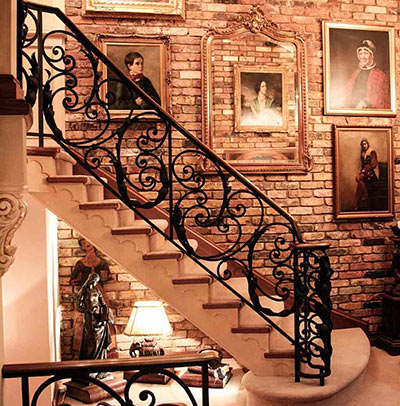
During the design phase of the contract Jon Elworthy of Jon Elworthy Design was inspired by the following image and used it to come up with a ceiling design for the main reception of the Mayfair Penthouse we were doing in 2018.
By the time the final design was settled the concept was quite different from the image, but it is good to remember thought processes, and the way the brain puts a scheme together.
The ceiling concept was soon nicknamed “pick up sticks”, after the popular family game of yesteryear.
We also thought that the stylised Doric column in the image would also be prefect for the final scheme.

Thought was put into how the weight of the fibrous panels would be supported, and the ceiling edge detail. It was decided that the favoured FB Specialist would turnkey the manufacture of both the “Sticks” ceiling, and the dropped edge detail. The edge detail moulding would be used throughout to flat, where a dropped, lit, ceiling detail was to be utilised.
The support MF ceiling and dropped ceiling section would be constructed by the main contractor Rigby and Rigby.
During the design phase of the contract Jon Elworthy of Jon Elworthy Design was inspired by the following image and used it to come up with a ceiling design for the main reception of the Mayfair Penthouse we were doing in 2018.
By the time the final design was settled the concept was quite different from the image, but it is good to remember thought processes, and the way the brain puts a scheme together.
The ceiling concept was soon nicknamed “pick up sticks”, after the popular family game of yesteryear.
We also thought that the stylised Doric column in the image would also be prefect for the final scheme.
Locker and Riley appointed
Jon Elworthy Design was of the opinion that there were very few Fibrous Plaster companies capable of producing this technically difficult ceiling.
We believed a lot of time could be wasted in putting this facet of the project out to tender and having to go through the myriad of questions each specialist would come up with. As a result, Jon Elworthy Design put forward Locker and Riley as their “favoured” specialist.
Jon Elworthy Design has worked with them many times, and Jon Riley was used to dealing with some of the more intricate designs Jon Elworthy Design have produced. Our recommendation was accepted, and L & R were appointed at an early stage to work with all parties to achieve the ceiling, at a still sensible price.
L&R took the drawing produced by Jon Elworthy Design, and the first thing they produced was a small (A4) 3D model of the ceiling. This gave the design team the confidence to accept the layout of the ceiling, however the depth of the tapering “sticks” was causing some concern, not only stylistically, but also to a lesser extent, weight-wise
Jon Elworthy Design carried on with the full design of the room producing several visuals to show the client the final design of the ceiling.


Jon Elworthy Design detail of the “raft” edge.

Jon Elworthy signed off the mock up and it was agreed that a finished section of the panel would be produced.

Jon Elworthy Design would subsequently use this finished mould to start the process of selecting a metallic paint finish to suit the scheme. In the end 5 sample areas were produced to allow the specialist decorator to try a variety of brush, and spray applied metallic paint finishes.
Below are to images of the full “pre-mould” set up of the ceiling. This is not the final ceiling.
This ceiling was filled and prepped prior to having a rubber mould taken.

When semi dry the full ceiling was cut into smaller manageable panels, which was then placed in the drying room.
Whilst all this work was being done the main contractor (Rigby and Rigby) was busy constructing the raised and dropped ceiling areas. The MF ceiling was load tested to ensure they would support the great weigh of the FP panels.
The panels were delivered to site and installed immediately, along with the preformed edge moulding detail.